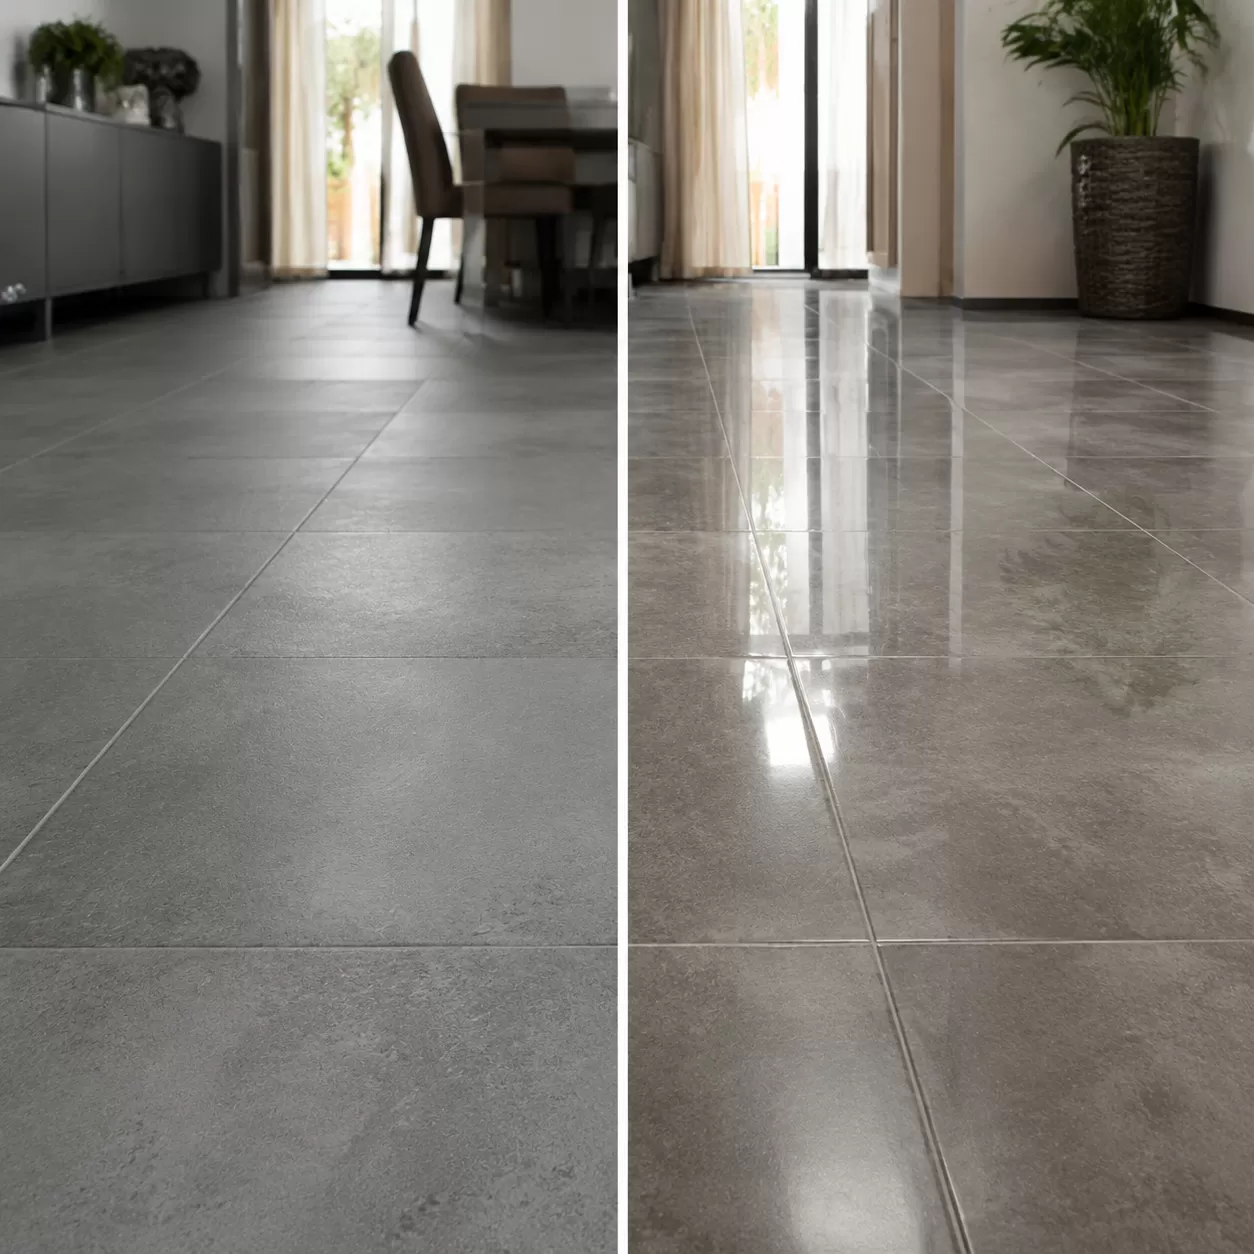
You’re tired of your “flat” floors and want that high-end, wet-look porcelain finish without the mess of a full renovation.
But before you grab a tin of wood varnish—stop. Applying traditional varnish to tile is a one-way ticket to a peeling, sticky disaster. If you want a high-gloss tile sealer that actually bonds to a non-porous surface, you need a strategy, not just a brush.
I’ve seen too many DIY tile gloss enhancements turn into maintenance nightmares because of poor chemistry. That’s why I’ve put together the definitive guide on topical floor coatings, slip resistance, and why high-density brands like YASIQI require a specific touch.
Ready to turn that dull matte into a mirror?
Let’s dive right in.
Varnish vs. Sealer: Understanding Floor Chemistry
I hear it all the time: “Can I just slap some wood varnish on my matte tiles to save a few bucks?” The short answer is absolutely not. Traditional wood varnish is formulated for organic, porous fibers that expand and contract. Tile is a dense, mineral-based surface. If you use varnish, you aren’t “beautifying” your floor; you’re creating a peeling, sticky nightmare that will be a disaster to strip later.
Why Wood Varnish Fails on Tile
- Zero Adhesion: Varnish cannot grip the glass-like surface of a tile. It will simply “sit” on top until the first heavy footfall causes it to flake.
- Flexibility Issues: Varnish is too brittle for the rigid nature of porcelain surfaces.
- Chemical Yellowing: Over time, UV exposure turns standard varnish into an ugly amber hue, ruining your floor’s original color.
Topical Gloss Sealers: The Industry Standard
If you want that wet-look porcelain finish, you need a topical gloss sealer (usually acrylic or urethane-based). These are the professional choice for tile surface restoration. Unlike varnish, these coatings are engineered for non-porous surface bonding, creating a synthetic “skin” that mimics the look of a factory-polished tile.
The Porcelain Factor: YASIQI Low-Absorption Surfaces
When working with YASIQI products, you’re dealing with world-class, high-density porcelain. Our manufacturing process ensures an incredibly low absorption rate, which is great for durability but tricky for DIY “shining.”
- Dense Matrix: YASIQI porcelain is so compact that standard big-box sealers often fail to bond.
- The Solution: You must use a high-solids topical floor coating specifically rated for matte vs. polished porcelain transitions to ensure the gloss doesn’t delaminate under high traffic.
- Precision Prep: Because the surface is so smooth, your deep clean must be surgical to ensure the sealer can actually find a “home” on the tile.
Pros and Cons: The Truth About Making Matt Floor Tiles Shiny
Before you decide to transform your floor, you need to weigh the aesthetic gains against the practical trade-offs. While a high-gloss tile sealer can mimic the look of expensive marble, it changes how your floor functions every day.
The Upside: Enhanced Color and Space
Applying a wet-look porcelain finish does more than just add a reflection; it changes the room’s energy.
- Vibrant Depth: The coating acts like a lens, making the underlying colors and patterns of your matte tiles look richer and more saturated.
- Visual Volume: Glossy surfaces bounce light into dark corners, making a cramped room feel significantly larger and more open.
- Modern Aesthetic: It provides that high-end, polished look without the cost of a full floor replacement.
The Downside: Slippage and Scratches
The biggest concern with DIY tile gloss enhancement is the shift in safety and durability.
- The Slip-and-Slide Factor: Matte tiles have a high slip resistance rating because of their texture. Adding a topical coating fills those pores, making the floor incredibly dangerous when even slightly wet.
- Visible Wear Patterns: Unlike factory finishes, a topical sealer sits on top of the tile. In high-traffic areas, you will eventually see “pathways” where the gloss has worn down.
- Scratch Visibility: High-shine surfaces act like a mirror; every piece of grit or dragged chair leg will leave a visible mark on the coating.
Comparison: DIY Gloss Coating vs. Factory Polished Tiles
I’ve seen many homeowners try to shortcut their way to a shine. Here is how a DIY application compares to professional YASIQI porcelain durability.
| Feature | DIY Topical Gloss Sealer | Factory Polished (YASIQI) |
|---|---|---|
| Durability | Temporary (requires re-coating) | Permanent (mechanical shine) |
| Maintenance | High (sensitive to chemicals) | Low (dense, non-porous) |
| Slip Resistance | Often low/unpredictable | Tested and rated for safety |
| Scratch Resistance | Low (sealer scratches easily) | High (surface is hard as stone) |
| Cost | Low initial / High long-term | Higher initial / Zero long-term |
While a high-gloss tile sealer is a quick fix for a dull room, it requires a commitment to constant maintenance. If you want a “set it and forget it” solution, starting with pre-polished porcelain is always the smarter investment for long-term tile maintenance and care.
The Deep Clean: Prepping Matte Floor Tiles to Become Shiny
You can’t shortcut the prep work. If you apply a topical floor coating over even a tiny bit of dust, oil, or footprint residue, you are essentially laminating that dirt onto your floor forever. This is the most common “permanent mistake” I see—once the sealer cures over grime, the only way to fix it is a full chemical strip. To get that professional wet-look porcelain finish, the surface must be surgically clean.
Professional Prep with Neutral Detergents and Borax
For a successful deep cleaning of floor tiles, I recommend moving beyond standard mopping. Use a combination of neutral detergents and borax to break down organic fats and oils. Borax acts as a mild abrasive and booster that lifts deep-seated dirt from the micro-pores of the matte surface without damaging the tile’s integrity.
Stripping Factory Wax and Grout Haze
Newer porcelain surfaces often carry a “transit wax” from the factory to prevent scratching during shipping. If you don’t remove this, your high-gloss tile sealer will simply peel off within weeks.
- Remove Factory Wax: Use a specialized wax stripper or a high-alkaline cleaner to ensure the surface is “bare.”
- Eliminate Grout Haze: Even a faint, invisible layer of cement residue will prevent non-porous surface bonding. Use a professional grout haze remover before starting.
- The Rinse: Rinse the floor at least twice with clean water. Any leftover soap film acts as a release agent that will cause your new shine to flake.
- Total Dry Time: Ensure the grout lines are 100% dry. Trapped moisture is the leading cause of “blushing,” where the sealer turns a milky white.
Step-by-Step Guide: Can Matt Floor Tiles be Varnished to Become Shiny?
Applying a high-gloss tile sealer is a precise process. If you want that high-end wet-look porcelain finish, you have to move beyond the idea of “painting” and think about “bonding.” Here is how I manage a professional-grade application to ensure the surface stays clear, durable, and bubble-free.
The Patch Test: Your Safety Net
Never coat the entire floor on the first go. I always start with an inconspicuous corner or a leftover loose tile. This “patch test” confirms that the topical floor coating will actually stick to your specific tile surface. It also lets you see exactly how many coats are needed to reach your desired level of shine before committing to the whole room.
Environmental Control and VOC Safety
Before you break the seal on your product, you need to lock down the room.
- Dust Management: Turn off AC units and fans. Any airborne dust that lands on the wet sealer will create a permanent, sandpaper-like texture.
- VOC Awareness: High-gloss sealers often have strong fumes. Wear a respirator and ensure there is a source of fresh air that doesn’t create a cross-breeze over the drying tile.
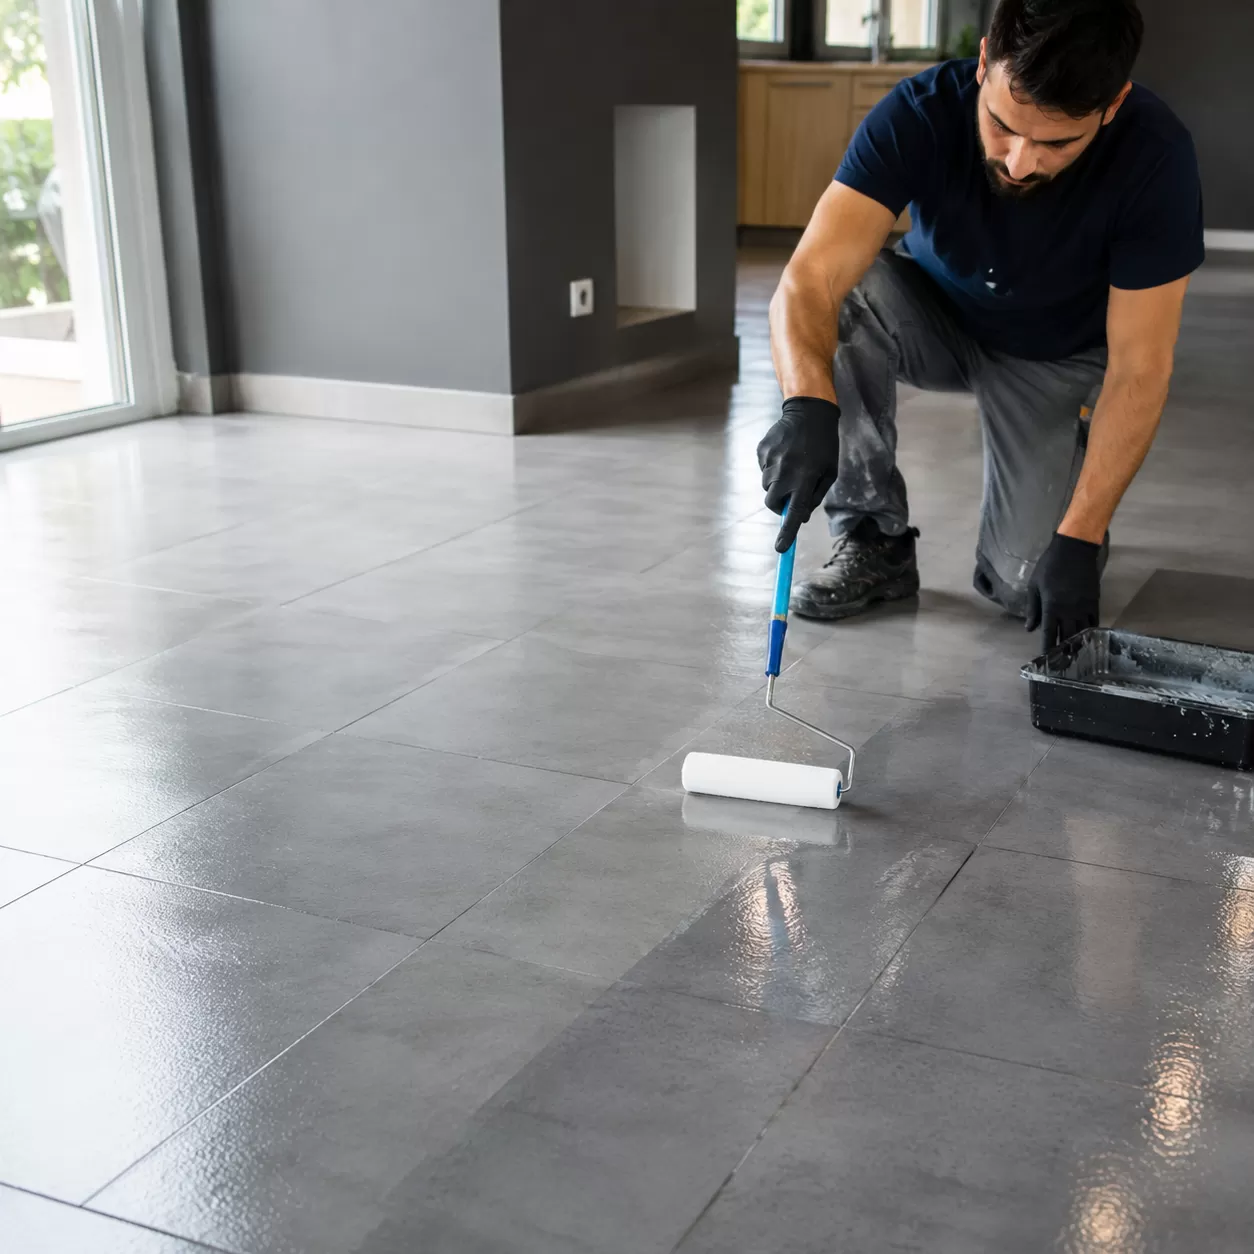
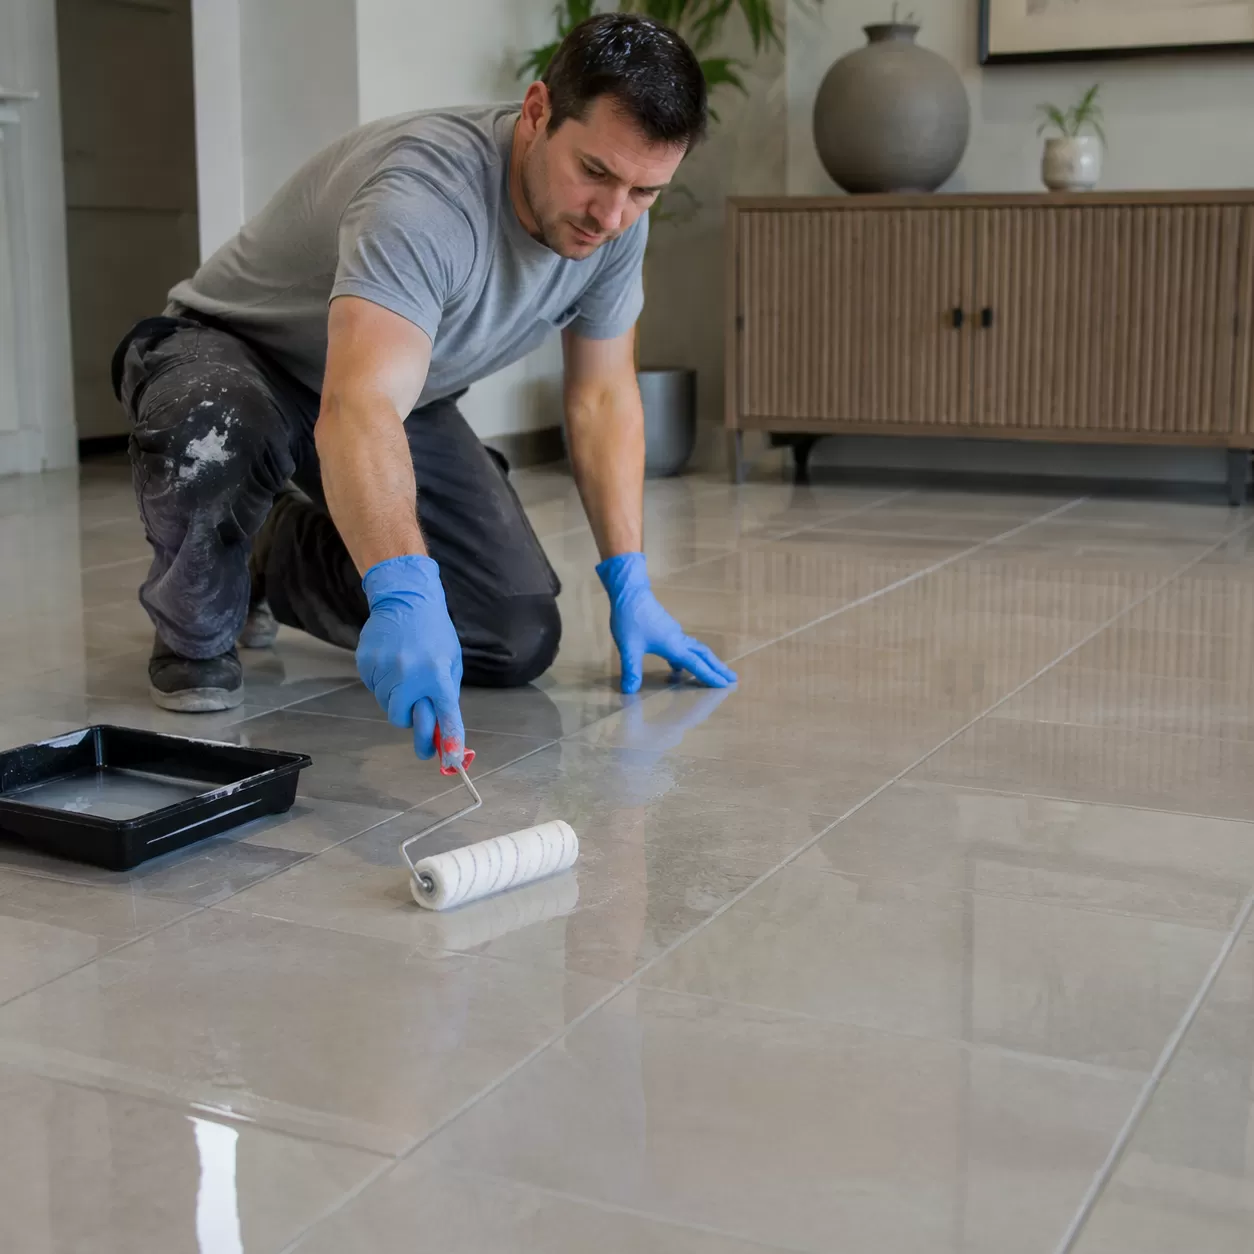
Application Technique: Microfiber vs. Rollers
The tool you choose determines the clarity of the finish. To avoid the dreaded “milky” look or trapped air bubbles, follow these guidelines:
- Microfiber Applicators: This is my preferred method. A flat microfiber mop allows for ultra-thin, even layers. It pushes the sealer into the texture of the matte tile without leaving lint or bubbles.
- High-Density Foam Rollers: Only use these if you have a very steady hand. Standard paint rollers hold too much product and often create a “stippled” or orange-peel effect that ruins the glossy look.
- The “Thin-to-Thick” Rule: Always apply two or three thin coats rather than one heavy layer. This ensures the sealer cures evenly from the bottom up.
Curing Time: The Key to Durability
Patience is the most important “tool” in your kit. While the surface might feel dry to the touch in an hour, the chemical bonding takes much longer.
- Foot Traffic: Keep everyone (and pets) off the floor for at least 24 hours.
- Full Cure: Avoid dragging furniture or performing a wet mop for 72 hours. Walking on the sealer too early can cause “blushing”—a permanent cloudiness caused by moisture or pressure interrupting the curing process.
| Step | Action | Why it Matters |
|---|---|---|
| Test | Inconspicuous corner | Prevents bonding failure and peeling. |
| Prep | Kill all fans/AC | Prevents dust from ruining the “glass” finish. |
| Apply | Use microfiber pads | Eliminates bubbles and “orange peel” texture. |
| Cure | Wait 24-72 hours | Ensures the tile surface restoration is scratch-resistant. |
Maintenance: Keeping the Shine Without the Stress
Once you’ve applied a high-gloss tile sealer to your floors, the goal is to protect that “wet look” from clouding or peeling. Unlike factory-polished porcelain, a topical finish requires a specific care routine to ensure your matte floor tiles stay shiny and clear for the long haul.
The “No-Steam” Rule
The biggest mistake you can make is using a steam mop. While great for raw tile, the intense heat and pressurized moisture can cause a topical floor coating to delaminate. This leads to unsightly flaking or a milky, opaque haze that ruins the transparency of the finish.
Safe Cleaning Practices
To maintain the wet-look porcelain finish without scratching the surface, I recommend sticking to gentle, non-abrasive tools and solutions:
- pH-Neutral Cleaners: Avoid bleach, ammonia, or vinegar. These acidic or alkaline substances slowly eat away at the acrylic or polyurethane bond.
- Microfiber Mops: Use a soft microfiber pad to trap dirt. Traditional string mops can be too abrasive and may leave streaks.
- Prompt Spill Cleanup: Liquids left sitting on a sealed surface can eventually penetrate the coating, leading to “blushing” (white spots).
The 18-to-24 Month Reality Check
It is important to remember that a gloss coating is a wearable layer. Depending on the traffic patterns in your home, the finish will eventually dull in high-use areas.
| Traffic Level | Re-application Timeline | Recommended Action |
|---|---|---|
| Low (Bedrooms) | 3+ Years | Spot clean and buff. |
| Moderate (Living Areas) | 18–24 Months | Lightly screen and recoat. |
| High (Hallways/Kitchens) | 12–18 Months | Deep clean and apply a fresh topcoat. |
By following these steps, you ensure your DIY transformation remains a professional-grade feature of your home rather than a temporary fix. Keeping the surface free of grit is the best way to prevent the traffic pattern wear that typically dulls a glossy floor.
When to Call Professionals to Make Matt Floor Tiles Shiny
Recognizing Etching vs. Dullness
Before you wonder, “Can matt floor tiles be varnished to become shiny?” you must identify why they look dull. If your floors have “cloudy” patches caused by acidic cleaners, that is etching, not just a lack of gloss. A topical sealer or “varnish” often fails to bond to etched surfaces. I always recommend a professional inspection if the tile feels rough or pitted, as applying a DIY coating over damaged porcelain will only highlight the imperfections.
Mechanical Polishing: The Permanent Alternative
If you want a wet-look porcelain finish without the maintenance of a chemical coating, professional mechanical polishing is the industry standard.
- The Process: Experts use industrial floor buffers with diamond-grit pads to physically grind the surface to a high-gloss state.
- The Benefit: There is no “film” to peel or scratch. The shine comes from the tile itself.
- Durability: It eliminates the risk of traffic pattern wear that usually plagues liquid sealers.
Why YASIQI Pre-Polished Porcelain Saves Headaches
As a manufacturer, I’ve seen many homeowners spend thousands trying to convert matte surfaces when they could have started with the right product. Our YASIQI pre-polished porcelain is engineered for high-traffic environments where a permanent, factory-grade shine is required.
| Feature | DIY Gloss Enhancement | YASIQI Pre-Polished Tiles |
|---|---|---|
| Finish Source | Topical chemical layer | Factory-fired liquid glass/glaze |
| Longevity | Requires re-coating every 1-2 years | Lifetime shine |
| Risk | Potential peeling and “slip-and-slide” | Controlled slip resistance |
If your current matte tiles are high-quality but just don’t fit your aesthetic, professional mechanical restoration is your best bet. However, for new projects, choosing a factory-finished YASIQI product ensures non-porous surface bonding and a flawless look without the DIY stress.
FAQ: Can matt floor tiles be varnished to become shiny?
I get these questions all the time from clients looking to upgrade their space without a full renovation. Transforming a matte surface into a glossy one is possible, but you have to do it the right way to avoid a mess.
Can I use polyurethane on floor tiles?
No, avoid standard wood polyurethane. It isn’t designed to bond with non-porous porcelain surfaces. If you apply it, it will eventually peel off in sheets. Instead, use a dedicated acrylic floor finish or a topical floor coating specifically formulated for tile and stone. These provide the “varnish” look with the necessary adhesion.
How do I fix a patchy sealer application?
If your high-gloss tile sealer looks streaky or cloudy, it’s usually due to moisture or uneven application.
- The Fix: You’ll likely need to use a floor stripper to remove the patchy layer.
- The Prevention: Ensure a deep clean and total dryness before re-applying. Always use a microfiber applicator to keep the layer thin and even.
Will making my matte tiles shiny make them dangerous?
Yes, there is always a trade-off. Adding a wet-look porcelain finish will significantly lower the slip resistance rating of your floor.
- Pro Tip: If you are coating tiles in a “splash zone” like a kitchen, look for a sealer that includes an anti-slip additive to maintain safety.
Can I wax my porcelain floors instead of sealing?
I don’t recommend using traditional floor wax for tiles. Wax is soft, attracts pet hair and dirt, and requires constant buffing. For the modern YASIQI porcelain durability you expect, a topical gloss sealer is a much better “set and forget” solution than old-school wax.
Can I change the look of my grout too?
While you are applying your gloss coating, it will naturally darken the grout, giving it a “wet” look. If you want a specific color change, handle the grout sealing and coloring before you apply your final high-gloss topcoat to ensure everything is locked in and uniform.
