Why Porcelain is the Superior Choice for Kitchens
In the high-traffic environment of a modern kitchen, flooring must withstand more than just foot traffic. It faces constant spills, heavy appliances, and frequent cleaning. Porcelain tile stands out as the premier material for these demands, offering a level of performance that standard ceramic or natural stone cannot match.
Low Water Absorption Rate and Moisture Resistance
The primary technical advantage of porcelain is its density. Our porcelain tiles feature a water absorption rate of less than 0.5%, making them virtually impervious to liquids.
- Stain Resistance: Spilled wine, oils, or sauces cannot penetrate the dense surface.
- Superior Moisture Resistance: This prevents subfloor rot and mold growth, even in kitchens prone to high humidity or occasional leaks.
- Easy Cleanup: The non-porous nature ensures that messes remain on the surface for effortless sanitization.
Durability and High PEI Rating
Kitchen floors endure dropped cookware and the weight of heavy cabinetry. Porcelain is fired at significantly higher temperatures than standard ceramic, resulting in a harder, more resilient product.
- High PEI Rating: We manufacture tiles with high wear ratings specifically designed for heavy residential and commercial kitchen use.
- Scratch Resistance: The surface resists damage from dragged chairs, pet claws, and grit.
- Structural Integrity: High breaking strength ensures the floor handles the load of professional-grade appliances without cracking.
The YASIQI Advantage: Manufacturing Excellence
As a dedicated porcelain tile manufacturer and supplier, we focus on aesthetic durability and precision engineering. We understand that a kitchen floor must look as good in ten years as it does on the day of installation.
| Feature | Benefit to Homeowner |
|---|---|
| Precision Rectification | Allows for ultra-thin grout lines and a seamless look. |
| Advanced Glazing | Provides deep, rich textures that do not fade under UV light. |
| Consistent Calibration | Ensures every tile is perfectly flat, eliminating lippage issues. |
Our manufacturing process combines global design trends with industrial-strength longevity, providing the global market with flooring solutions that are both beautiful and indestructible.
Essential Tools and Materials for Tiling a Kitchen Floor with Porcelain Tiles
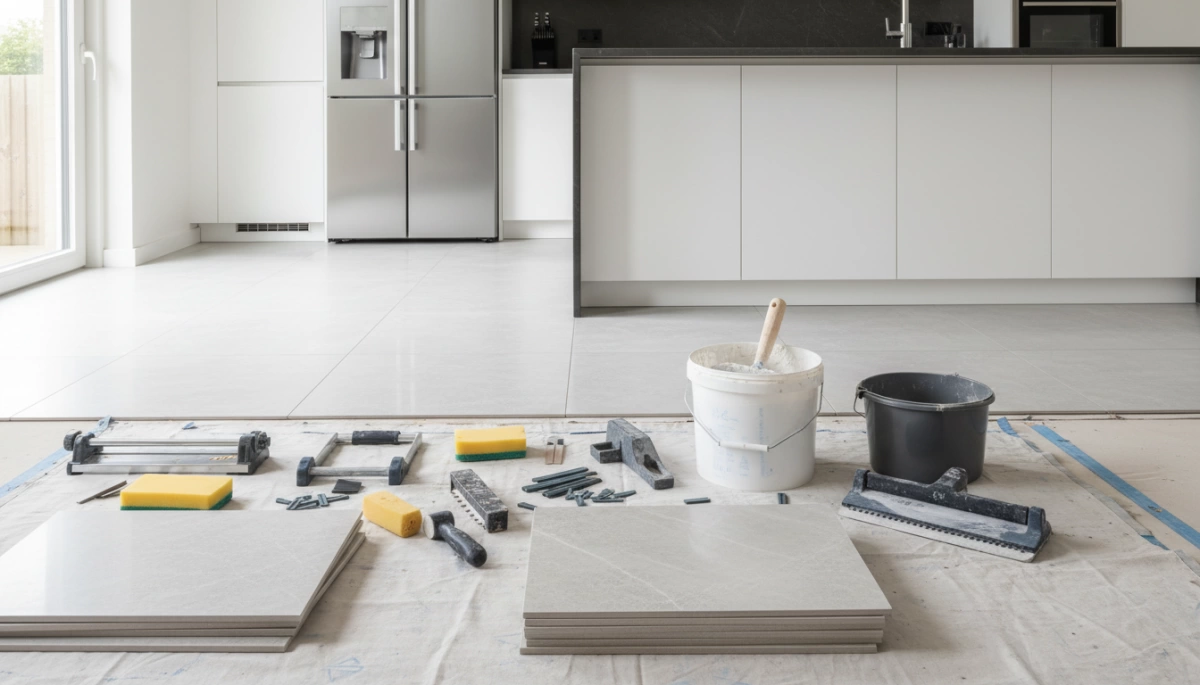
Before we start laying any tile, I always make sure the staging area is stocked with the right gear. Porcelain is denser and tougher than standard ceramic, so your tool selection needs to reflect that. Using the wrong blade or the wrong adhesive will lead to cracked tiles or a bond that fails within a year.
The Professional Tool Kit
To get a clean, level finish, these are the non-negotiables I use on every job:
- Wet Tile Saw with a Diamond Blade: Because porcelain is so hard, a manual snap cutter often jaggeds the edges. A wet saw with a continuous-rim diamond blade is the only way to get factory-smooth cuts.
- Notched Trowel: For the large-format porcelain tiles popular in modern kitchens, I recommend a 1/2″ x 1/2″ square-notched trowel. This ensures enough thin-set mortar is applied to support the tile weight.
- Tile Leveling System: Don’t rely on sight alone. Use clips and wedges to pull the tiles perfectly flush, eliminating “lippage” (uneven edges) that can cause tripping.
- Rubber Grout Float: A high-density float is necessary to pack the joints tight without leaving air pockets.
- Tile Spacers: These keep your layout lines straight and your grout joints consistent across the entire floor.
Selecting Mortar and Grout for Kitchen Environments
The chemistry of your materials matters just as much as your tools. Since our porcelain has an extremely low water absorption rate, standard mortar won’t cut it.
- Polymer-Modified Thin-set: You must use a high-bond, polymer-modified mortar. This adhesive is specifically designed to “grab” the non-porous back of a porcelain tile and create a permanent chemical bond with the substrate.
- Sanded Grout: For most kitchen floors, I suggest sanded grout. It contains sand particles that act as a filler, making the joints stronger and preventing the grout from shrinking or cracking in joints wider than 1/8 inch.
- Unsanded Grout: Only choose this if you are installing rectified porcelain with razor-thin joints (less than 1/8 inch) or a highly polished finish that might be scratched by sand.
Having these materials ready ensures the installation moves quickly and the results last for decades.
Phase 1: Subfloor Preparation for Porcelain Tiles
The success of tiling a kitchen floor with porcelain tiles depends entirely on the foundation. As manufacturers, we see that most installation failures stem from poor substrate preparation rather than the tile itself. A rock-solid, flat surface is non-negotiable for a professional result.
Assessing the Substrate: Concrete vs. Plywood
Before we start, we identify the base material to determine the necessary reinforcement:
- Concrete: Must be fully cured, dry, and free of any “laitance” or surface dust. We check for cracks; if present, they require an isolation membrane to prevent them from telegraphing through the porcelain.
- Plywood: Standard subfloors often have too much flex. To prevent floor deflection, we ensure the subfloor is at least 1 1/8″ thick. If there is any bounce, we add a layer of cement backer board or additional exterior-grade plywood.
Ensuring a Level Surface
Porcelain tiles, particularly large format porcelain, are unforgiving on uneven floors. We use a self-leveling compound to eliminate dips and shadows.
- High Spots: Ground down using a diamond cup wheel.
- Low Spots: Filled with a high-quality leveler to achieve a tolerance of 1/8 inch over 10 feet.
Cleaning and Priming for Adhesion
Maximum adhesion requires a pristine surface. We strip away all grease, old adhesive residues, and drywall dust. Once clean, we apply a substrate primer. This is a critical step that prevents the subfloor from absorbing moisture from the thin-set, which would otherwise weaken the bond and cause tiles to pop.
Installing a Moisture Barrier or Uncoupling Membrane
In a high-moisture environment like a kitchen, we always recommend an uncoupling membrane.
- Movement Management: It allows the tile and the subfloor to move independently, which is the best way to prevent grout and tile cracking.
- Moisture Protection: It serves as a moisture barrier, protecting wood subfloors from kitchen spills and humidity.
- Support: It provides a consistent, waterproof surface that is ready for immediate thin-set application.
Phase 2: Mastering the Layout for Tiling a Kitchen Floor with Porcelain Tiles
A great tile job is won or lost in the layout phase. Before opening a single bag of mortar, I always map out the room to ensure the floor looks symmetrical and professional. Rushing this step usually leads to awkward, tiny cuts at the walls that scream “amateur.”
Finding the Center Point and Layout Lines
I start by measuring the length and width of the kitchen to find the exact center of the room. Using a chalk line, I snap two intersecting lines to create a crosshair. This serves as the starting point for the entire installation.
- Snap clear layout lines: These guides keep rows straight across long distances.
- Check for square: Use the 3-4-5 triangle method to ensure your layout lines are perfectly perpendicular.
The “Dry Fit” Process to Avoid Sliver Cuts
The “Dry Fit” is my secret to a flawless finish. I lay out a full row of porcelain tiles in both directions along the chalk lines, using tile spacers to account for grout lines.
- Identify sliver cuts: If the tile reaching the wall is less than half its original width, I shift the center line slightly.
- Balance the perimeter: The goal is to have equal-sized cuts on opposite sides of the room.
- Visual check: This is the best time to see how large format porcelain patterns flow across the floor.
Accounting for Expansion Joints
In large kitchens, porcelain tiles need room to breathe. Changes in temperature and humidity cause the subfloor to move, and without expansion joints, your tiles can crack or tent.
- Perimeter gaps: I leave a 1/4-inch gap between the tile and the walls or cabinetry. This gap is later hidden by baseboards or toe kicks.
- Large spans: For floors exceeding 25 feet in any direction, I integrate soft joints (color-matched caulk instead of hard grout) to absorb movement and prevent floor deflection issues.
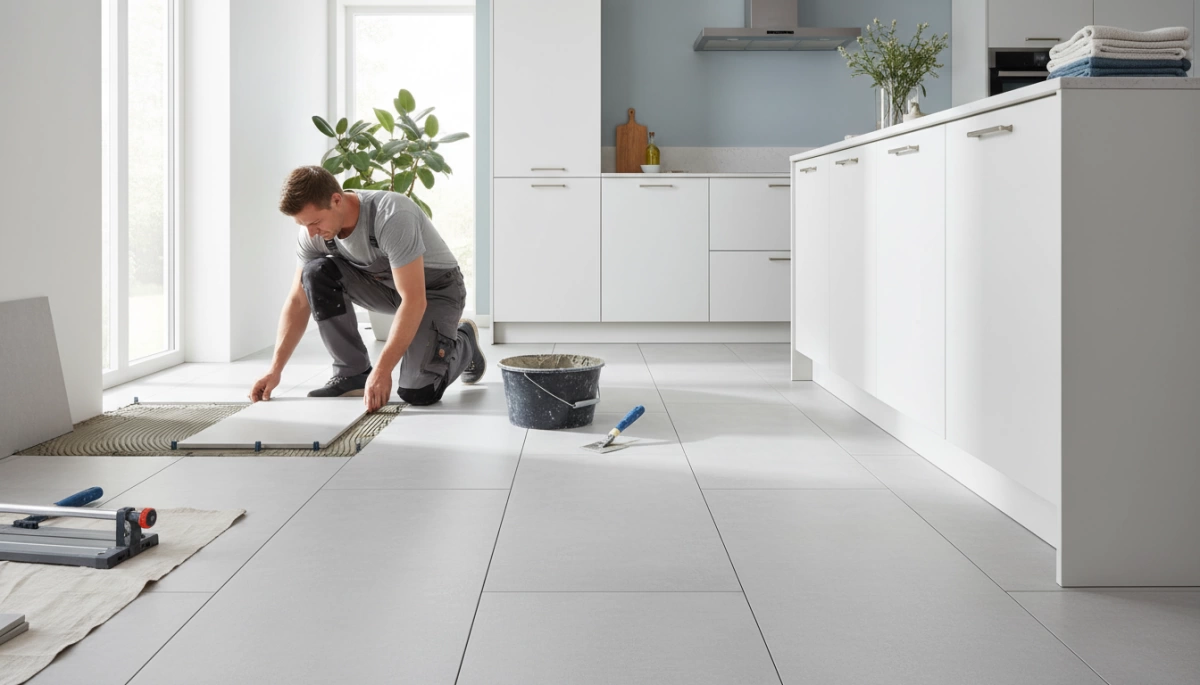
Phase 3: The Installation Process for Tiling a Kitchen Floor with Porcelain Tiles
When you start the actual installation, timing and technique are everything. I follow a strict process to ensure the bond is permanent and the finish is professional.
Mixing Thin-set Mortar to Perfection
The bond is only as good as the mix. I use a high-quality thin-set mortar designed specifically for the low water absorption rate of porcelain.
- Consistency: Aim for a “peanut butter” texture. It should be thick enough to hold a ridge from a notched trowel without sagging, but wet enough to transfer to the tile.
- Slaking: After the initial mix, let the mortar sit for about 10 minutes to allow the chemicals to fully hydrate, then give it one final stir.
- Small Batches: Only mix what you can use in 30 minutes to prevent the mortar from skinning over.
The Back-Buttering Technique for Large Format Porcelain
Because we specialize in large format porcelain, I always insist on back-buttering. This isn’t optional for a high-traffic kitchen floor.
- Apply a thin, flat layer of mortar to the entire back of the tile before placing it.
- This ensures 100% coverage and eliminates air pockets that could lead to cracking under the weight of heavy appliances.
Setting Tiles and Using a Leveling System
Start at your center point and work outward toward the walls.
- Placement: Press the tile into the mortar and give it a slight wiggle to collapse the ridges.
- Tile Spacers: Use high-quality tile spacers or a mechanical leveling system to maintain perfectly straight grout lines and prevent “lippage” (where one tile edge is higher than the next).
- Clean as You Go: Use a damp sponge to wipe away any mortar that squeezes up into the grout joints or onto the tile face before it hardens.
Cutting Porcelain with a Diamond Blade Saw
Porcelain is incredibly dense and durable, which makes it harder to cut than standard ceramic.
- The Right Tool: Use a wet saw equipped with a continuous-rim diamond blade saw.
- Precision: For L-shaped cuts around cabinets or door frames, the wet saw provides the cleanest edges without chipping the factory finish.
- Slow and Steady: Let the blade do the work; forcing a cut through dense porcelain can cause the tile to snap or the blade to overheat.
Grouting and Final Touches for Tiling a Kitchen Floor with Porcelain Tiles
The final stage of tiling a kitchen floor with porcelain tiles determines the longevity and look of the entire project. Before starting, I ensure the thin-set mortar has cured completely, typically waiting 24 hours. Walking on tiles too early can break the bond and lead to uneven grout lines.
Applying Grout Like a Pro
When the mortar is set, I mix the grout to a smooth, paste-like consistency. Using a rubber grout float is essential for a clean finish.
- The 45-Degree Rule: Hold the float at a 45-degree angle to the tile surface. This angle prevents the edge of the float from gouging grout out of the joints.
- Full Penetration: Press the grout firmly into the gaps. You want to pack the joints tight to maintain the floor’s moisture resistance and structural integrity.
- Work in Sections: Focus on a small area (about 10-15 square feet) at a time so the grout doesn’t harden on the tile face before you can clean it.
Haze Removal and Cleaning
After the grout has sat for about 15 to 20 minutes, a thin grout haze will appear on the porcelain. This is the time to clean.
- Damp Sponge Wipe: Use a bucket of clean water and a dense tiling sponge. Wring it out until it is only slightly damp. Too much water will weaken the grout and cause color shading issues.
- The Final Polish: Once the moisture dries and the haze reappears, use a dry microfiber cloth to buff the tiles. Since our porcelain has an incredibly low water absorption rate, the haze should lift easily without staining the tile surface.
Sealing for Stain Resistance
While the porcelain tiles themselves are impervious to spills, the grout lines are often porous. To keep a kitchen floor looking new, I always apply a high-quality grout sealer once the joints have cured for 48 to 72 hours. This extra step prevents grease, wine, and food particles from penetrating the lines, ensuring the floor remains easy to maintain for years.
Maintenance Tips for a Lifetime Kitchen Floor
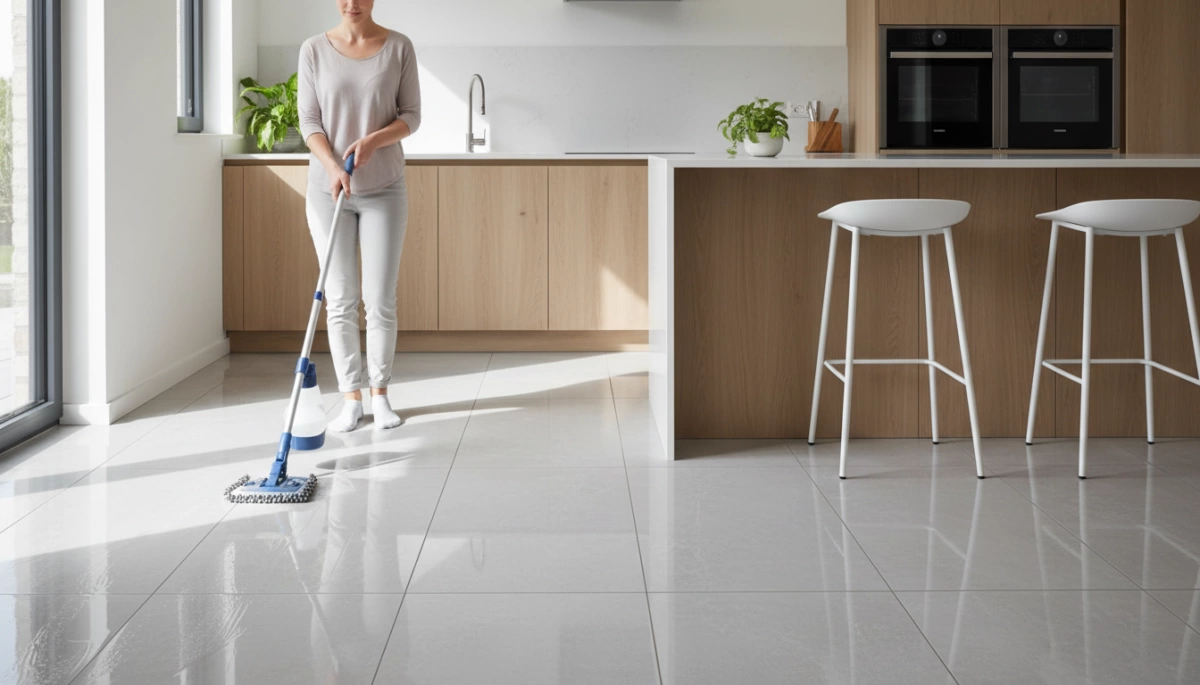
Once you’ve finished tiling a kitchen floor with porcelain tiles, the goal is to keep that “just installed” look for decades. Porcelain is famous for its low water absorption rate, making it naturally resistant to stains, but a simple routine ensures it stays pristine.
Daily Cleaning Routines
- Sweep or Vacuum: Remove grit and dirt daily. Small pebbles can act like sandpaper over time, potentially dulling the finish.
- Damp Mopping: Use warm water and a pH-neutral cleaner. Avoid oil-based soaps or wax-based cleaners, as these leave a film that attracts more dirt.
- Microfiber Mops: Use a microfiber mop to avoid streaks, especially on polished or large format porcelain surfaces.
Protecting Your Grout
The tile itself is nearly indestructible, but the grout is the vulnerable point.
- Avoid Abrasive Chemicals: Never use heavy bleach, ammonia, or acidic cleaners. These eat away at the grout and can eventually cause it to crumble.
- Spill Management: Wipe up acidic spills—like lemon juice or wine—immediately. Even with a high PEI rating, the grout lines can still absorb liquids if left sitting.
- Periodic Sealing: If you used standard cementitious grout, re-seal the lines once a year to maintain its moisture barrier properties.
Long-Term Care
- Furniture Pads: Use felt protectors under heavy kitchen islands or chairs to prevent scratches.
- Avoid Steam Mops on Grout: While great for the tile, frequent high-pressure steam can sometimes loosen grout over many years.
By sticking to these simple steps, your porcelain floor will remain the centerpiece of your kitchen without showing its age.
FAQs About Tiling a Kitchen Floor with Porcelain Tiles
Navigating the technical side of a renovation can be tricky. Based on our experience as manufacturers, here are the most common questions we get about tiling a kitchen floor with porcelain tiles.
How long does it take to tile a kitchen floor?
For a standard-sized kitchen, plan for a 3 to 5-day timeline.
- Day 1: Substrate preparation and layout lines.
- Day 2: Setting the porcelain tiles with thin-set mortar.
- Day 3: Allowing the mortar to cure (crucial for large format porcelain).
- Day 4-5: Grouting, cleaning grout haze, and sealing.
Can I tile over existing vinyl or tile?
While you can tile over old ceramic if it is perfectly level and well-bonded, we generally advise against it. Tiling over vinyl is a major risk because vinyl is flexible. Porcelain is rigid; if the base moves, your tiles or grout lines will crack. For the best results, strip the floor down to the concrete or plywood subfloor.
Do I really need an uncoupling membrane?
We highly recommend it. An uncoupling membrane prevents the movement of the subfloor from transferring to the tile. Since porcelain is dense and brittle, any slight shift in your home’s foundation or joists can cause cracks. This layer acts as insurance for your investment.
What is the best PEI rating for kitchen floors?
For residential kitchens, you should look for a PEI rating of 3 or 4.
- PEI 3: Suitable for average residential foot traffic.
- PEI 4: Ideal for high-traffic kitchens or homes with pets and heavy activity.
Our YASIQI porcelain products are engineered to meet these standards, ensuring the surface doesn’t dull or scratch over time.
How do I prevent floor deflection?
Floor deflection, or “bounce,” is the leading cause of cracked porcelain. To prevent this:
- Ensure your floor joists are spaced correctly (usually 16 inches on center).
- Use a sturdy substrate like 3/4-inch exterior grade plywood topped with a cement backer board.
- If the floor still feels springy, you may need to add blocking between joists from below to stiffen the structure.
