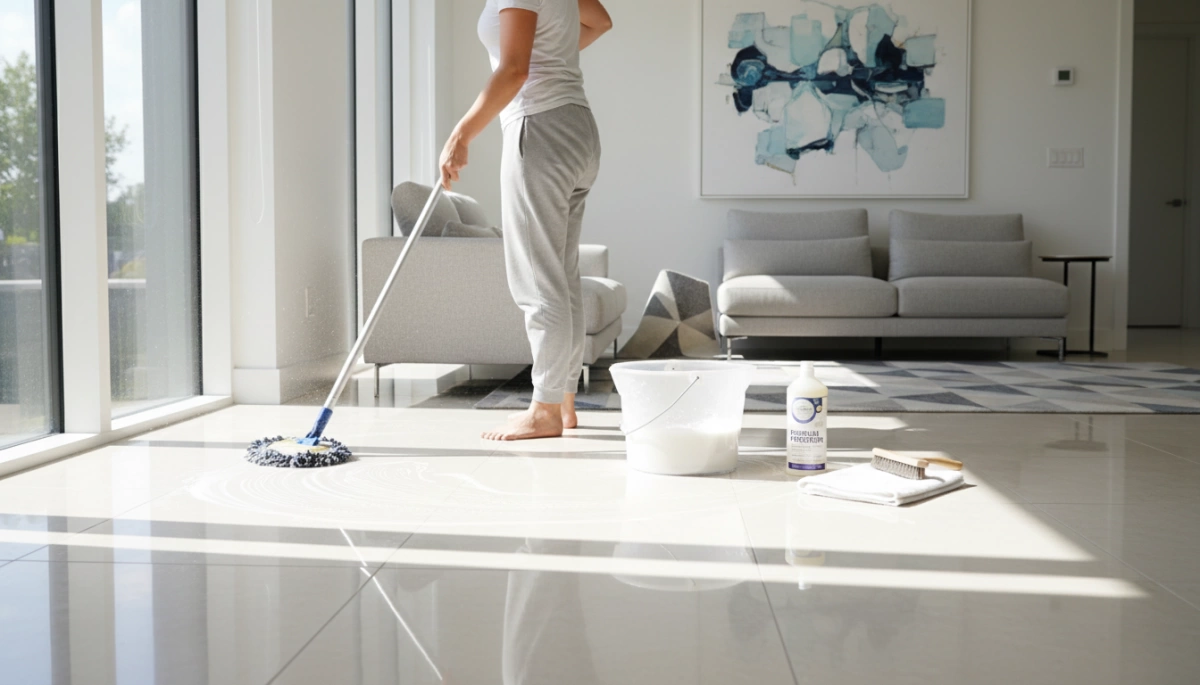
Essential Tools for Cleaning Porcelain Tile Floors
Maintaining the factory-fresh look of your flooring starts with selecting the right equipment. As a leading porcelain tile manufacturer and supplier, I have seen how the wrong tools can dull a premium finish over time. To keep your surfaces pristine, you need a kit that balances effectiveness with surface protection.
The Microfiber Advantage
When it comes to how to clean porcelain tile floors, the material of your mop matters. I always recommend a microfiber cloth or mop head over traditional cotton strings.
- Superior Trapping: Microfiber features tiny fibers that lift and lock in dirt rather than pushing it into grout joints.
- Lint-Free: It leaves no residue or fibers behind, ensuring a streak-free finish.
- Absorbency: It requires less water, which prevents pooling and potential water spots.
Steam Mops for Chemical-Free Sanitizing
For those who prefer to avoid detergents, a steam mop is a powerful ally. It uses pressurized vapor to loosen stubborn grime and kill bacteria without leaving a chemical film. This is particularly effective for glazed porcelain tile, as the heat evaporates quickly, leaving the surface dry and sanitized in seconds.
The Essential Cleaning Solution Kit
You don’t need expensive, harsh chemicals to achieve a professional result. My recommended “kit” consists of three simple components:
- Warm Water: The universal solvent for most daily dust and light soil.
- Distilled White Vinegar: A natural, mild acid that acts as an excellent degreaser when diluted.
- pH-Neutral Cleaners: Essential for maintaining the integrity of the tile’s surface and any surrounding tile sealant.
Soft-Bristle Brushes vs. Abrasive Pads
Texture requires a gentle touch. While it might be tempting to grab a scouring pad for a tough stain, abrasive pads and steel wool can create microscopic scratches that trap dirt permanently.
- Soft-Bristle Brushes: Use these for agitated cleaning in corners or on textured surfaces.
- Non-Abrasive Scrubbers: These provide enough friction to remove scuff marks without compromising the porcelain durability.
Step-by-Step: Daily and Weekly Maintenance Routine
Maintaining the factory-fresh look of your floors is easier than most people think. When I talk to clients about how to clean porcelain tile floors, I always emphasize that consistency beats intensity. Follow this simple three-step routine to keep your surfaces pristine.
Step 1: Dry Soil Removal
The biggest enemy of a porcelain finish is loose grit. Sand and dirt act like sandpaper underfoot, which can eventually lead to micro-scratches.
- Sweep Daily: Use a soft-bristle broom to gather dust and debris.
- Vacuum Weekly: Use a vacuum with a soft brush attachment to pull dirt out of the grout joints. Ensure the beater bar is turned off to avoid marking the tile.
Step 2: The Warm Water Wipe-Down
For your weekly maintenance, you don’t need harsh detergents. Most glazed porcelain tile only requires a simple damp mop to stay clean.
- Use Warm Water: It’s the most effective way to loosen light spills without leaving a chemical film.
- Damp, Not Soaked: Wring your mop out well. Excessive water can pool in grout lines and lead to discoloration over time.
Step 3: Buffing for a Streak-Free Shine
If you want that high-end showroom look, do not let the floor air dry. Air-drying often leaves behind mineral deposits from the water, resulting in a cloudy appearance.
- The Microfiber Finish: Immediately after mopping, go over the floor with a clean, dry microfiber cloth.
- Eliminate Water Spots: Buffing the surface ensures a streak-free finish and restores the natural reflectivity of the tile.
| Frequency | Action | Tool |
|---|---|---|
| Daily | Remove loose grit | Soft broom or microfiber dust mop |
| Weekly | Deep surface clean | Mop with warm water |
| Post-Mop | Polish and dry | Dry microfiber cloth |
Deep Cleaning Porcelain Tile: The YASIQI Method
When standard sweeping isn’t enough to cut through built-up grime, I recommend a deeper approach to restore your floor’s original luster. At YASIQI, we’ve found that the most effective deep cleaning solution doesn’t require expensive chemicals; it relies on the right technique and simple, household ingredients.
The Natural Vinegar Degreaser
For a heavy-duty clean that remains eco-friendly and safe for your home, distilled white vinegar is the gold standard. It acts as a natural degreaser that cuts through oils and surface residue without damaging the tile’s integrity.
- The Mix: Combine 1/4 cup of distilled white vinegar with one gallon of warm water.
- The Benefit: This ratio is acidic enough to lift dirt but diluted enough to protect the grout joints.
- The Tool: Use a clean microfiber cloth or mop to apply the solution.
Sectional Application Technique
The biggest mistake people make when learning how to clean porcelain tile floors is mopping the entire room at once. If the water dries before you wipe it up, you’re just moving dirt around.
- Work in small sections: Focus on a 3×3 foot area at a time.
- Agitate gently: Use a non-abrasive scrubber on stubborn spots or high-traffic paths.
- Stay wet: Ensure the surface stays damp while you work to prevent the lifted dirt from re-settling into the pores of the tile.
The Critical Final Rinse
Never skip the final rinse. Even a natural solution like vinegar can leave a slight film if left to sit, which may attract more dust over time.
- Fresh Water: Use a secondary bucket of plain, cool water.
- Total Removal: Wipe down the cleaned sections to remove any remaining acidic traces.
- Dry Immediately: Use a fresh microfiber towel to buff the area dry. This prevents hard water deposits and ensures a streak-free finish that highlights the quality of your porcelain.
Mastering Grout Joints: Keeping Your Tile Lines Pristine
While the porcelain tiles we manufacture are incredibly dense and resistant to staining, the grout between them is a different story. Grout is naturally porous, meaning it acts like a sponge for dirty mop water, grease, and dust. If your floor looks “off” even after a mop, the grout joints are usually the culprit.
Deep Cleaning with a Natural Paste
To lift stubborn stains without damaging the tile finish, I rely on a simple, effective DIY solution. This method breaks down grime without the need for aggressive alkaline cleaners.
- The Mixture: Create a thick paste using baking soda and a little bit of water.
- Application: Apply the paste directly to the grout lines and let it sit for 5–10 minutes.
- The Reaction: Spray the paste with a mix of distilled white vinegar and warm water. The fizzing action helps lift deep-seated dirt to the surface.
- Agitation: Use a non-abrasive scrubber or a soft-bristle brush to gently work the solution into the texture of the grout.
- Rinse: Wipe the area clean with a damp microfiber cloth to ensure no surface residue remains.
The Role of Tile Sealant in Maintenance
Prevention is always more efficient than scrubbing. Because grout is the “weak link” in terms of moisture absorption, applying a high-quality tile sealant is essential.
A professional-grade sealer creates an invisible barrier that prevents liquids from penetrating the grout. This ensures that spills stay on the surface where they can be easily wiped away, preserving the porcelain durability and aesthetic of your installation for years. I recommend re-sealing grout lines every year or two, depending on the foot traffic in your space.
Specialized Care for Different Porcelain Finishes
Different porcelain surfaces require specific techniques to maintain their look and durability. As a manufacturer, I recommend tailoring your approach based on whether your glazed porcelain tile is polished, matte, or unglazed to master how to clean porcelain tile floors effectively.
Polished Porcelain: Maintaining High-Gloss Reflectivity
Polished tiles are stunning but show every smudge and footprint. To achieve a streak-free finish, you must avoid heavy detergents that leave a dulling surface residue.
- The Goal: Maintain that mirror-like reflection and high-gloss shine.
- The Method: Use a microfiber cloth or mop with warm water and a small amount of distilled white vinegar.
- Pro Tip: Always buff the floor dry immediately after mopping. This is the only way to prevent hard water deposits from forming visible spots on the reflective surface.
Textured and Matte Porcelain: Lifting Dirt from Crevices
Textured tiles provide excellent slip resistance but tend to trap dirt in their “nooks and crannies.” Standard mopping often just pushes dirt deeper into the texture.
- The Goal: Extract dirt from the low points of the tile surface.
- The Method: Start by using a vacuum with a soft brush attachment to pull out loose grit. Follow up with a pH-neutral cleaner and agitate the surface with a non-abrasive scrubber or soft-bristle brush.
- Pro Tip: Clean in multiple directions (a cross-hatch pattern) to ensure the bristles reach all depths of the texture.
Unglazed Tiles: Caring for Raw Surfaces
Unglazed porcelain is incredibly dense and has a consistent color throughout. While it is rugged, unglazed tile maintenance requires a gentle touch to prevent surface staining.
- The Goal: Prevent deep-set staining on the raw, non-porous surface.
- The Method: Use a mop bucket system with a dedicated deep cleaning solution that is strictly pH-neutral. Avoid alkaline cleaners unless dealing with heavy grease.
- Pro Tip: Even though the tile itself is dense, ensure your grout joints are protected with a high-quality tile sealant to keep the entire installation looking pristine.
| Finish Type | Main Challenge | Recommended Cleaning Tool |
|---|---|---|
| Polished | Smudges & Water Streaks | Microfiber Mop & Dry Buffing |
| Textured | Grime in Crevices | Soft-Bristle Brush & Vacuum |
| Unglazed | Surface Scuffs | pH-Neutral Cleaner & Mop |
What to Avoid When Cleaning Porcelain Tile Floors
To keep your floors looking brand new, knowing what not to do is just as important as the cleaning itself. As a manufacturer, we see many beautiful installations ruined by improper care. Avoiding these common mistakes will protect the finish and structural integrity of your tiles.
Say No to Harsh Chemicals
Using the wrong cleaning agents can cause long-term damage to both the tile surface and the grout joints.
- Bleach and Ammonia: These are too aggressive. They can discolor your grout and, over time, weaken the bond between the tiles.
- Oil-Based Cleaners: Avoid any soaps containing oil or animal fats. These leave a sticky surface residue that traps dirt and makes the floor look perpetually dull.
- Acidic Cleaners: While distilled white vinegar is great for deep cleans, avoid high-concentration acids that can eat away at the sealant or the tile’s glaze.
Ditch the Abrasive Tools
Porcelain is famous for its durability, but it isn’t invincible against metal.
- Steel Wool and Scouring Pads: Never use metal-based scrubbers. These can leave behind tiny metal particles that rust, or worse, create permanent scratches on glazed porcelain tile.
- Hard Bristle Brushes: Stick to soft-bristle brushes or a non-abrasive scrubber. Hard bristles can wear down the finish of polished tiles, stripping away their natural luster.
Why You Should Never Wax Porcelain
One of the biggest mistakes we see is the application of wax or floor polishes.
- Non-Porous Surface: Porcelain is extremely dense. Unlike natural stone, wax cannot soak into the tile. It simply sits on top, creating a cloudy, streak-prone mess.
- Dirt Magnet: Wax creates a “tackiness” that attracts hair, dust, and grime.
- Safety Hazard: Waxing porcelain makes the surface incredibly slippery and dangerous for foot traffic.
By sticking to a pH-neutral cleaner and avoiding these damaging habits, you ensure your investment remains a highlight of your home for decades.
Professional Tips for Long-Term Brilliance
Maintaining the look of your space doesn’t have to be a full-time job. As a manufacturer, we’ve seen how simple habits keep porcelain tile floors looking brand new for decades.
Preventive Measures in High-Traffic Areas
The biggest enemy of a polished finish is abrasive grit. Placing high-quality doormats at every entrance traps dirt and sand before it reaches your floors. In high-traffic zones like hallways or under kitchen sinks, use area rugs to provide an extra layer of protection against constant foot traffic and heavy impact.
Immediate Spill Management
While porcelain is incredibly dense, you should never let spills sit. Liquid messes, especially acidic ones like wine or coffee, should be wiped up immediately with a microfiber cloth. This prevents “ghosting”—those faint outlines that can appear if liquids are left to evaporate on the surface or seep into the grout joints.
Why Quality Matters for Maintenance
The secret to easy maintenance is the quality of the tile itself. Our high-grade porcelain is engineered to make your life easier. High-quality tiles offer:
- Low Water Absorption: Naturally resists deep-set stains and moisture.
- Superior Density: Prevents dirt from becoming trapped in the surface pores.
- Durable Finish: Reduces the need for aggressive scrubbing or specialized chemicals.
Choosing premium tiles from the start significantly reduces the effort required to clean porcelain tile floors and ensures the surface remains brilliant without the need for constant deep cleaning.
Frequently Asked Questions About How to Clean Porcelain Tile Floors
Can I use a steam mop on all porcelain tiles?
Yes, steam mops are generally safe and highly effective for most glazed porcelain tile and unglazed surfaces. As a manufacturer, we recommend them because they sanitize the floor using only warm water, eliminating the need for harsh chemicals. However, ensure your grout joints are in good repair to prevent excessive moisture from getting trapped behind the tiles.
Is distilled white vinegar too acidic for long-term use?
Distilled white vinegar is a powerful natural degreaser, but it should be used strategically. While it is great for occasional deep cleaning, we suggest using a pH-neutral cleaner for your daily routine. Over time, highly acidic solutions can potentially wear down certain tile sealants or affect the color of your grout.
How do I remove stubborn hard water stains?
Hard water deposits often create a cloudy surface residue that ruins a streak-free finish. To remove these:
- Apply a 1:1 solution of vinegar and water to the area.
- Let it sit for 2–3 minutes (do not let it dry).
- Scrub gently with a non-abrasive scrubber.
- Rinse thoroughly with clean water and buff dry with a microfiber cloth.
Will vacuuming scratch my porcelain floors?
Vacuuming is safe as long as you use a vacuum with a soft brush attachment. Avoid using a vacuum with a rotating beater bar or “power head” designed for carpets, as the stiff bristles or plastic parts can cause scuff marks or fine scratches on highly polished porcelain surfaces over time.
How often should I deep clean my grout?
Even with high-quality porcelain durability, grout is porous and attracts dirt. We recommend a focused grout cleaning every 6 to 12 months. Using a deep cleaning solution or a baking soda paste helps maintain the original color and prevents permanent staining. Applying a tile sealant to the grout lines after cleaning is the best way to reduce future maintenance effort.
