Essential Tools and Materials for 12×24 Tile Installation
Installing large format tiles requires specialized tools and high-grade materials to guarantee a flawless, durable finish. Because 12×24 porcelain tiles are heavier and more prone to lippage than smaller ceramics, using the correct gear is non-negotiable for a professional-grade global standard installation.
Required Tools for Cutting and Laying Large Format Tile
Succeeding with large format tiles comes down to precision execution. The following tools are essential for handling, cutting, and setting 12×24 panels:
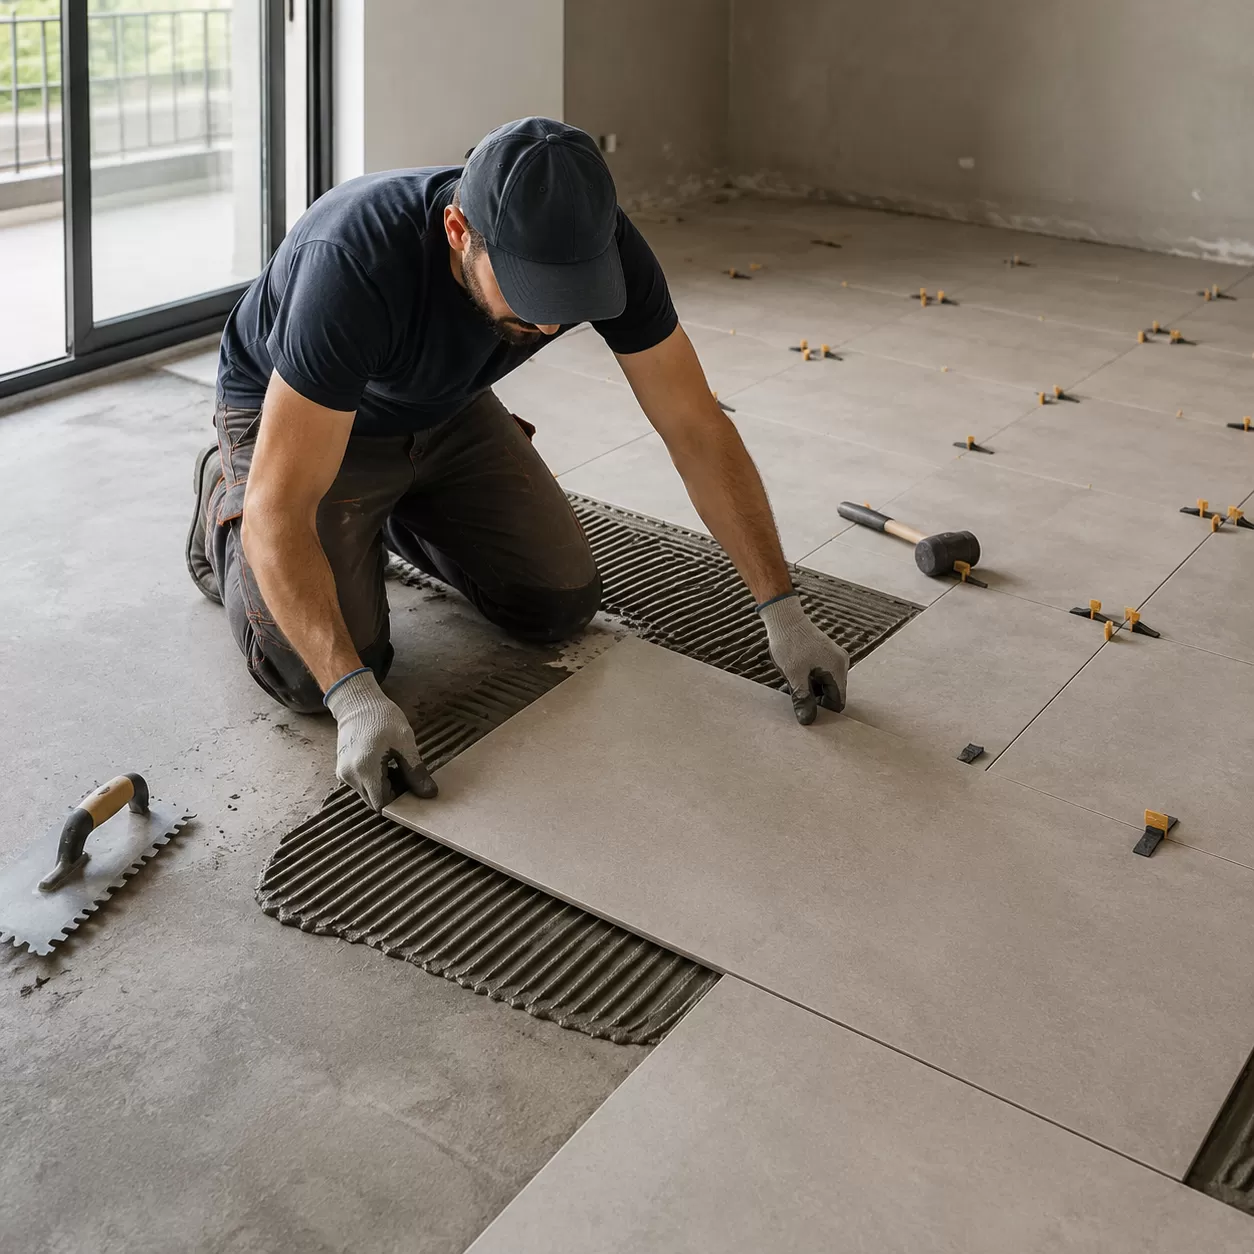
- 1/2″ x 1/2″ Square-Notch Trowel: Essential for achieving proper mortar coverage and bed depth for larger tile profiles.
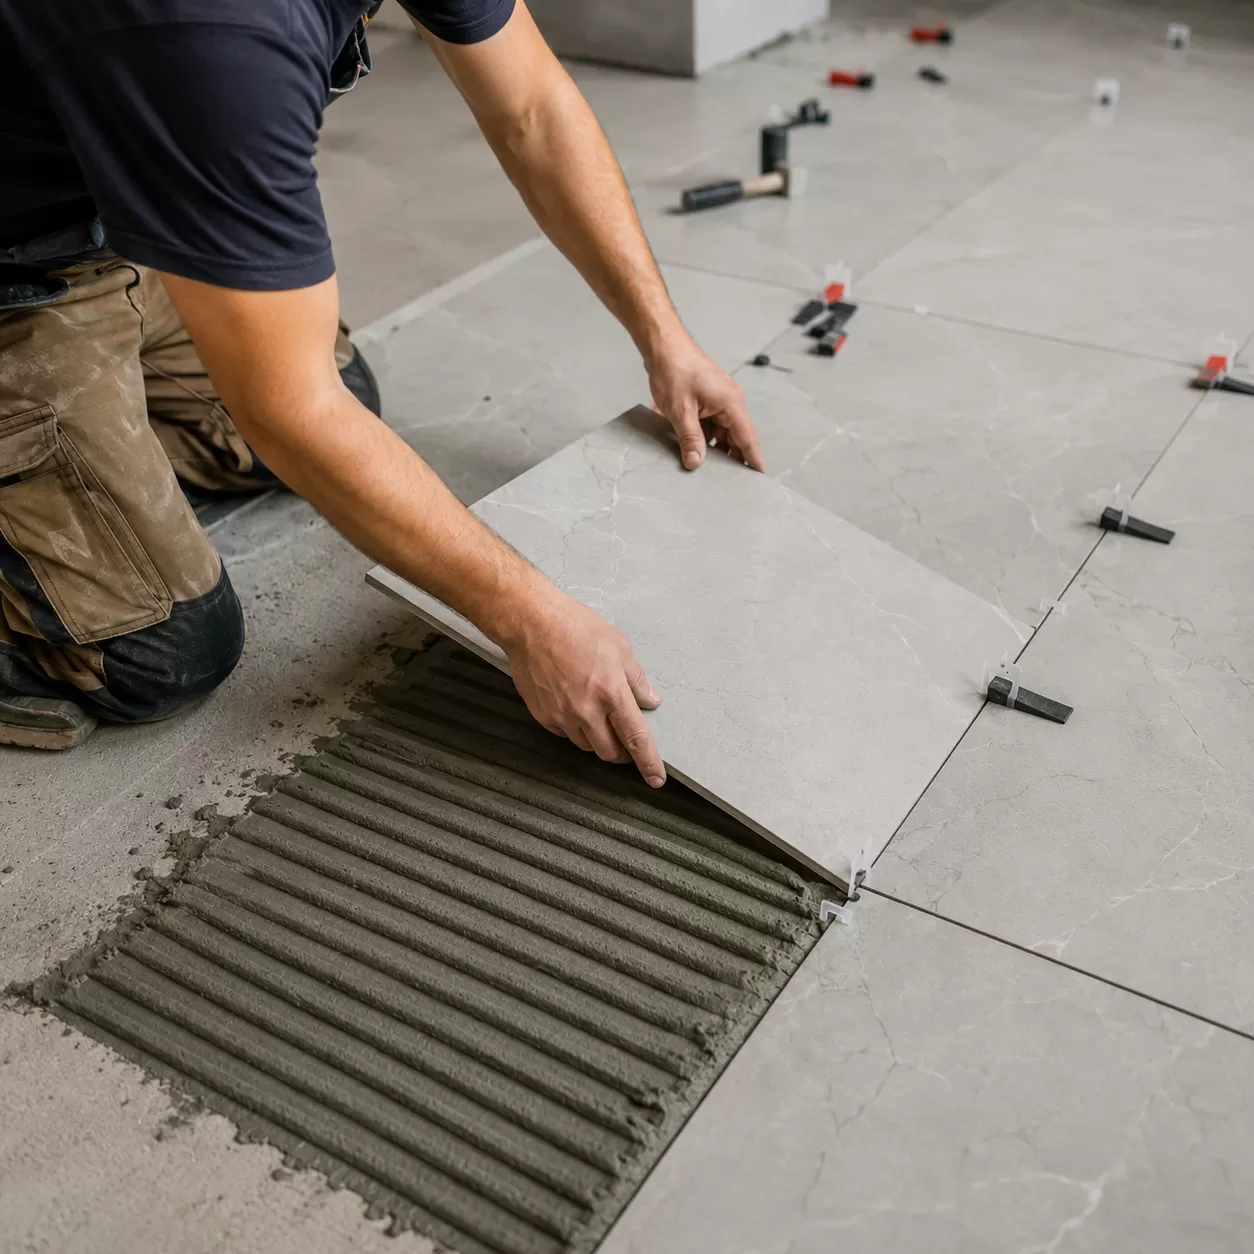
- Tile Leveling Clips and Wedges: A mandatory system to lock tile edges perfectly flat and eliminate lippage.
- Rubber Mallet: Used to firmly embed the porcelain tile into the thinset mortar bed.
- Margin Trowel: For scooping mortar and cleaning excess material out of joints.
- Suction Cup Lifters: Highly recommended for safely handling, placing, and adjusting 12×24 tiles without dropping them.
Choosing the Right Thinset Mortar for Porcelain Tiles
Porcelain is dense and exhibits a near-zero water absorption rate, meaning standard mortars will not create a secure bond.
- Use a Polymer-Modified Large and Heavy Tile (LHT) Mortar: Formerly known as medium-bed mortar, LHT thinset is engineered to support the weight of large format tiles without sagging or shrinking as it cures.
- Thinset Nonsag Properties: Ensure the chosen mortar specifies “nonsag” properties for wall applications or heavy floor installations to keep layout lines perfectly true.
Selecting the Best Grout Joint Size
Large format tiles require careful calculations regarding thermal expansion and manufacturing tolerances.
| Tile Edge Type | Recommended Grout Joint Size | Best Use Case |
|---|---|---|
| Rectified (Ground) Edges | 1/16″ to 1/8″ | Ultra-modern, seamless, minimal joint aesthetics |
| Calibrated (Pressed) Edges | 3/16″ or 1/4″ | Traditional looks; masks slight variations in tile dimensions |
Pro Tip: Never butt joint 12×24 porcelain tiles together. A minimum grout joint of 1/8″ is globally recommended for standard floors to allow for natural structural movement and avoid tile tenting.
Subfloor Preparation and Flatness Requirements
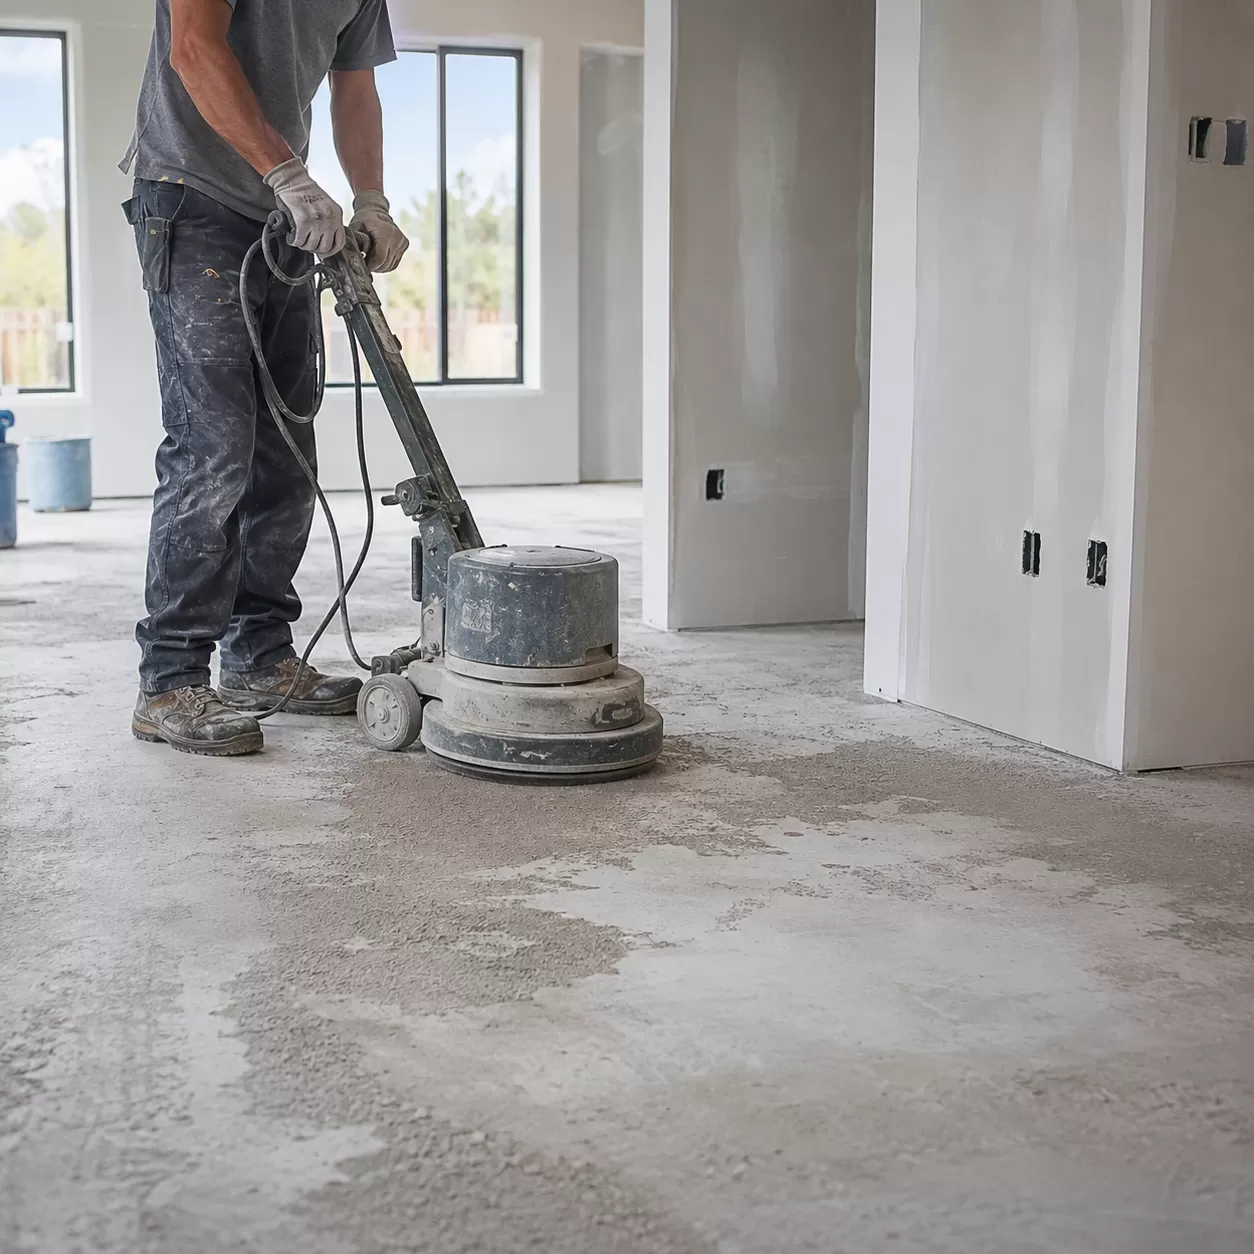
When learning how to lay a 12×24 porcelain tile, your prep work determines the final result. Large format tiles have zero tolerance for uneven floors. If the subfloor is wavy, you will get lippage—where the edges of adjacent tiles don’t sit flush.
Testing and Achieving Floor Flatness
Before mixing any mortar, you must verify the subfloor is perfectly flat. Industry standards require the surface to be flat within 1/8 inch over a 10-foot span.
How to test and fix subfloor flatness:
- The Straightedge Test: Lay a 10-foot straightedge (or a straight level) across the floor. Look for gaps underneath.
- Identify Problem Areas: Mark low spots with a pencil and high spots with a marker.
- Fixing the Variations: Use the correct correction method based on your subfloor type.
| Subfloor Type | High Spots Solution | Low Spots Solution |
|---|---|---|
| Concrete | Grind down with a diamond cup wheel | Fill with self-leveling underlayment |
| Plywood/OSB | Sand down high joints | Apply a cement leveler or add underlayment |
Clearing and Cleaning the Work Surface
A clean bond requires a spotless floor. Any dust, drywall mud, or debris left behind will prevent the thinset mortar from sticking properly to the substrate, leading to hollow tiles or future cracking.
- Scrape: Use a floor scraper to remove old adhesive, paint overspray, and drywall joint compound.
- Vacuum: Clean the entire zone with a shop vac. Sweeping with a broom is not enough because it leaves fine dust particles behind.
- Wipe Down: Wipe concrete subfloors with a damp sponge. This stops the dry concrete from sucking the moisture straight out of your mortar too quickly.
Choosing the Right 12×24 Tile Pattern
Choosing the layout pattern for your 12×24 porcelain tile isn’t just about looks—it directly impacts the structural integrity and smoothness of your floor. Large format tiles require specific patterns to prevent uneven edges and guarantee a professional finish.
Understanding the 33% Offset (Stairstep) Pattern
The 33% offset pattern, also known as a stairstep layout, is the industry standard for installing large format tiles. Instead of lining up the joints perfectly or cutting them down the middle, each row shifts by one-third of a tile length (about 8 inches).
- Reduces Lippage: Minimizes the noticeable height differences between tile edges.
- Stronger Bond: Distributes weight evenly across the floor.
- Visual Appeal: Creates a natural, flowing look that masks minor subfloor imperfections.
Why 50% Brick Joint Patterns are Avoided
A traditional 50% brick joint layout works great for small subway tiles, but it is highly discouraged for a 12×24 porcelain tile. During the manufacturing process, large porcelain tiles naturally develop a slight upward bow or crown in the center.
If you use a 50% offset, the highest point of one tile (the middle) aligns with the lowest point of the adjacent tiles (the corners). This results in severe lippage, creating tripping hazards and unsightly shadows. As a porcelain tile supplier and manufacturer, we always advise installers to stick to a maximum 33% offset to maintain a flat surface.
Determining Vertical vs. Horizontal Orientation
The direction you lay your tiles completely changes the perception of your space. Consider these design principles before mixing your thinset mortar:
| Orientation | Best For | Visual Impact |
|---|---|---|
| Horizontal (Landscape) | Narrow hallways, small bathrooms | Pushes the walls out visually, making tight rooms feel wider. |
| Vertical (Portrait) | Low ceilings, entryways | Draws the eye upward, making ceilings feel higher and spaces longer. |
How to Cut 12×24 Porcelain Tiles
Cutting large format tiles requires the right technique to prevent cracking and ensure clean edges. Because porcelain is dense and tough, using the correct tool for each specific cut saves time and minimizes wasted material.
Using Score and Snap Manual Cutters
For straight, edge-to-edge cuts, a manual tile cutter is the fastest and cleanest option. It requires no electricity and creates minimal mess.
- The Process: Score the polished surface of the 12×24 porcelain tile in one smooth, continuous motion from end to end.
- The Snap: Apply firm, downward pressure on the handle to snap the tile cleanly along the scored line.
- Best For: Standard straight cuts and reducing tile length or width.
Making Complex Cuts with a Handheld Electric Grinder
When you need to navigate obstacles like plumbing pipes, electrical outlets, or heating vents, a handheld angle grinder is the best tool for the job.
- Blade Choice: Always use a continuous-rim diamond blade specifically rated for porcelain.
- Technique: Cut halfway through the tile thickness on your marked line, then complete the cut from the back to prevent chipping.
- Best For: L-shaped cuts, U-cuts around door jambs, and circular holes.
Straight and Clean Cuts with a Wet Saw
For the smoothest possible edges on visible borders, a diamond-blade wet saw is essential. The constant water flow cools the blade and prevents the porcelain from shattering.
- Feed Rate: Push the tile slowly and steadily through the blade. Forcing it too fast will cause jagged edges or break the corners.
- Pro Tip: If you notice edge chipping, use a diamond rubbing pad to smooth out the factory finish.
- Best For: High-precision straight cuts, mitered edges, and heavy-duty trimming.
Step-by-Step Guide to Laying 12×24 Tiles
Laying large format tiles requires a strategic approach to ensure a flat, durable finish. We always emphasize that the installation process dictates the longevity of your floor. Following a precise sequence prevents common installation failures and delivers professional results.
Mixing and Applying the Mortar Correctly
Achieving the right bond strength starts with proper mortar preparation and application techniques.
- Mix to Consistency: Mix your thinset mortar to a creamy, peanut-butter-like consistency. Let it slake (rest) for 5 to 10 minutes, then remix without adding more water.
- Use the Right Trowel: Use a $1/2text{-inch} times 1/2text{-inch}$ square-notch trowel to comb the mortar onto the subfloor in straight, parallel lines. Never comb in swirls, as this traps air pockets under the tile.
- Back-Butter Every Tile: Because 12×24 porcelain tiles have a large surface area, you must flat-trowel a thin layer of mortar onto the back of each tile. This ensures 100% coverage and prevents hollow spots.
Placing Tiles and Preventing Lippage with Leveling Clips
Because large tiles are prone to slight natural bowing, avoiding uneven edges (lippage) requires the right tools.
- Set and Collapse: Place the tile onto the mortar bed, then twist and slide it slightly perpendicular to the trowel ridges to collapse the ridges and maximize adhesion.
- Deploy Leveling Clips: Insert a interlocking tile leveling system under the tile edges. Slide the clips under the tile before placing the adjacent piece, then insert the wedges and tighten them with plier tools to force the tile surfaces perfectly flush.
- Check Frequently: Keep a 2-foot bubble level handy to constantly verify that the installation remains flat across multiple tiles as you progress.
Maintaining Consistent Spacing and Clean Joints
Neatness during the installation phase saves hours of corrective work before grouting.
| Action Item | Method | Why It Matters |
|---|---|---|
| Set Joint Width | Use heavy-duty spacers alongside leveling clips. | Ensures perfectly straight grout lines across long runs. |
| Clean Excess Mortar | Rake out squeeze-out from the joints with a utility knife while wet. | Leaves clean spaces for the grout to pack in tightly. |
| Wipe Tile Faces | Use a damp sponge to clean thinset off the tile surface immediately. | Prevents dried mortar from scratching the porcelain face during cleanup. |
Grouting and Post-Installation Cleanup
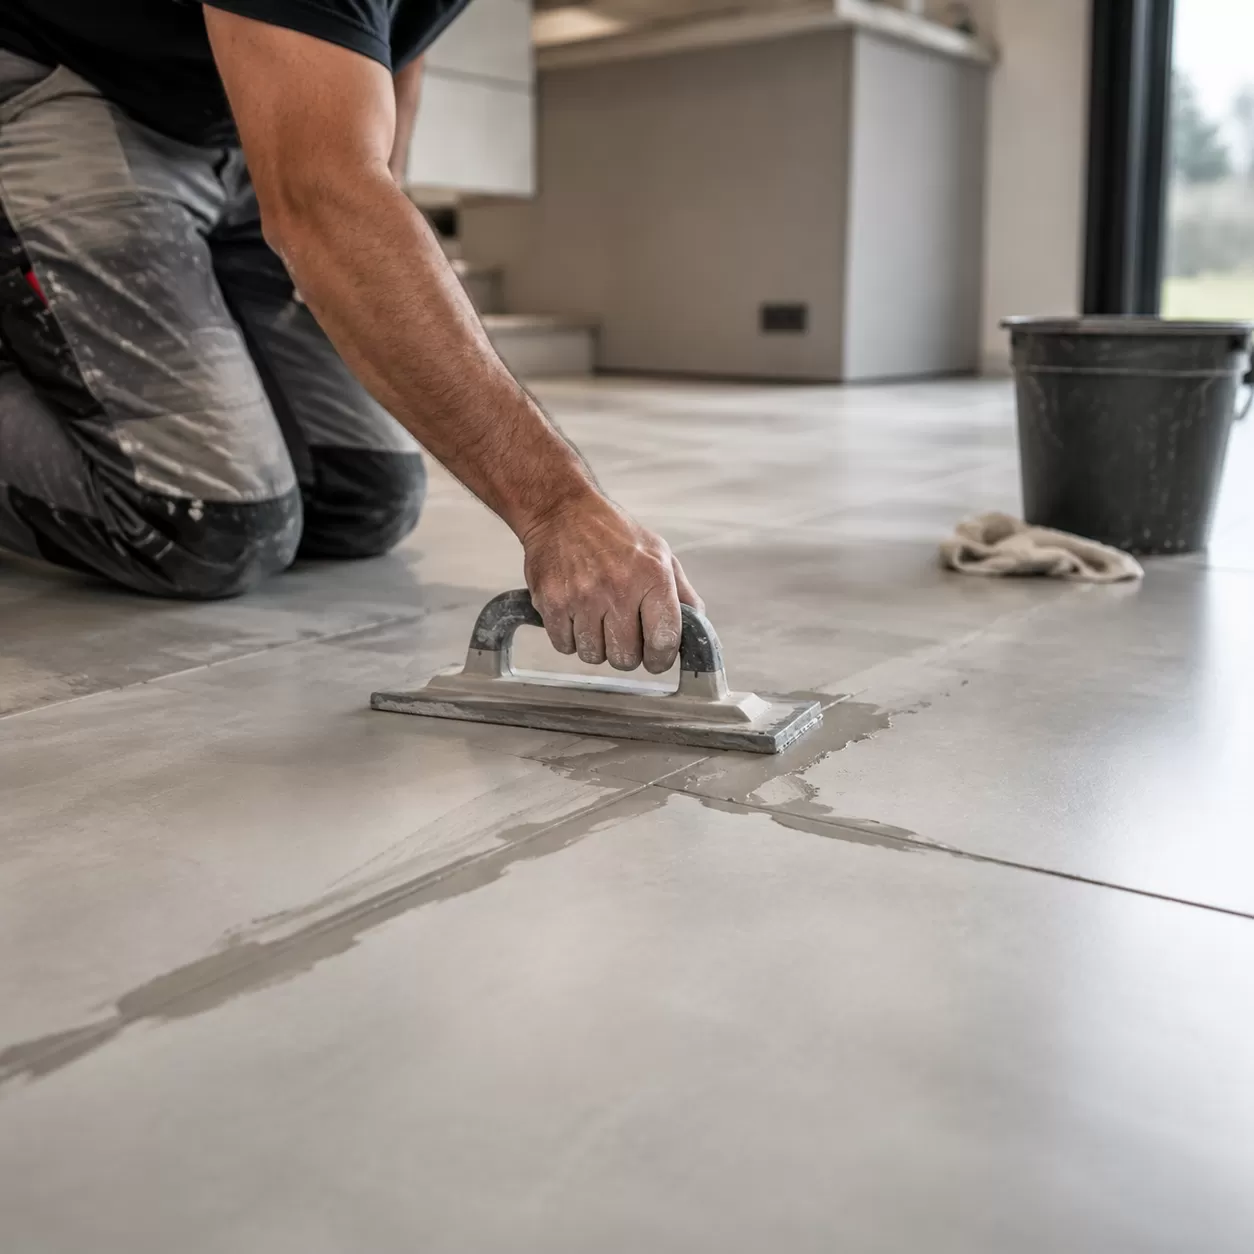
Applying Grout to Large Format Tile Joints
Once your large format tiles are firmly set and the mortar has cured for 24 hours, it is time to fill the seams. Remove the leveling clips and ensure the joints are completely free of debris.
- Mix the grout: Blend your chosen grout to a smooth, peanut-butter consistency.
- Hold the float at 45°: Use a rubber grout float to pack the mixture deeply into the joints.
- Work diagonally: Always move the float diagonally across the 12×24 porcelain tile faces to avoid gouging the grout out of the channels.
- Firm pressure: Apply solid pressure to guarantee no air pockets are left behind.
Sponging and Cleaning Excess Grout Residue
Cleaning up promptly prevents the grout from forming a stubborn haze on the porcelain surface.
| Step | Action | Key Tip |
|---|---|---|
| 1. Wait | Let the grout firm up in the joints for 15 to 30 minutes. | It should be damp but firm to the touch. |
| 2. First Wipe | Use a damp, well-wrung cellulose sponge to wipe diagonally. | Do not use too much water, or you will wash out the color pigment. |
| 3. Rinse | Clean the sponge frequently in fresh water and do a final pass. | Change the water bucket often to avoid streaking. |
Pro Tip:We always recommend a microfiber cloth to buff away any remaining dry grout haze the following day.
Frequently Asked Questions About 12×24 Tile Installation
How Much Waste Material Should I Estimate?
When calculating how to lay a 12×24 porcelain tile floor, always add a 10% to 15% waste factor to your total square footage. We always remind clients that large format tiles require more cuts, especially around walls and corners.
- Standard Rooms: Add 10% for basic layout patterns.
- Complex Layouts: Add 15% if your space has a lot of angles, pillars, or a herringbone design.
- Buffer Room: This extra percentage covers accidental cracks during cutting and ensures you have matching dye lots for future repairs.
What Makes 12×24 Tiles Harder to Install Than Smaller Tiles?
Laying large format tiles comes with a unique set of challenges that you don’t encounter with standard square options.
- Subfloor Imperfections: Because of their long profile, 12×24 tiles will highlight any dips or bumps in your floor. A flat subfloor is absolutely critical to avoid cracking.
- Tile Warpage: Large porcelain tiles naturally have a slight crown or bow in the center from the manufacturing kiln. If you don’t use the right offset or a proper notch trowel, this bow causes noticeable lips between tiles.
- Lippage Risks: Heavy tiles sink into thinset mortar at different rates. To get a perfectly flush finish, you must use a heavy-duty tile leveling clips system rather than relying on standard spacers alone.
